In this post we will see how to upload a file to Document library to a specific folder path using rest api in SharePoint online and SharePoint 2013.
1) Create a Document Library (SampleDocuments) with 2 columns( Column1 and Column2) .Create a folder(Folder1) in that.
2) Copy the below script and to a notepad and save the file with name FileUploadScript.js
$(document).ready(function () {
	SP.SOD.executeFunc('sp.js', 'SP.ClientContext', function () {
		init();
	});
});

function init()
{
	$("#btnUploadFiles").click(function(){
		var files=$("#inputTypeFiles")[0].files;
		uploadFiles(files[0]); // uploading singe file
	});
}

function uploadFiles (uploadFileObj) {
	var fileName = uploadFileObj.name;
	var webUrl = _spPageContextInfo.webAbsoluteUrl;
	var documentLibrary="SampleDocuments";
	var folderName = "Folder1";
	var targetUrl = _spPageContextInfo.webServerRelativeUrl + "/" + documentLibrary + "/" + folderName;
	var url = webUrl + "/_api/Web/GetFolderByServerRelativeUrl(@target)/Files/add(overwrite=true, url='" + fileName + "')?$expand=ListItemAllFields&@target='" + targetUrl + "'";

	uploadFileToFolder(uploadFileObj, url, function (data) {
		var file = data.d;
		var updateObject = {
			__metadata: {
				type: file.ListItemAllFields.__metadata.type
			},
			Column1: 'Test Data',   //meta data column1
			Column2: 'Test Data'    //meta data column2
		};

		url = webUrl + "/_api/Web/lists/getbytitle('"+documentLibrary+"')/items(" + file.ListItemAllFields.Id + ")";

		updateFileMetadata(url, updateObject, file, function (data) {
			alert("File uploaded & meta data updation done successfully");
		}, function (data) {
			alert("File upload done but meta data updating FAILED");
		});
	}, function (data) {
		alert("File uploading and meta data updating FAILED");
	});
}

function getFileBuffer(uploadFile) {
	var deferred = jQuery.Deferred();
	var reader = new FileReader();
	reader.onloadend = function (e) {
		deferred.resolve(e.target.result);
	}
	reader.onerror = function (e) {
		deferred.reject(e.target.error);
	}
	reader.readAsArrayBuffer(uploadFile);
	return deferred.promise();
}

function uploadFileToFolder(fileObj, url, success, failure) {
	var apiUrl = url;
	var getFile = getFileBuffer(fileObj);
	getFile.done(function (arrayBuffer) {
		$.ajax({
			url: apiUrl,
			type: "POST",
			data: arrayBuffer,
			processData: false,
			async: false,
			headers: {
				"accept": "application/json;odata=verbose",
				"X-RequestDigest": jQuery("#__REQUESTDIGEST").val(),
			},
			success: function (data) {
				success(data);
			},
			error: function (data) {
				failure(data);
			}
		});
	});
}

function updateFileMetadata(apiUrl, updateObject, file, success, failure) {
	$.ajax({
		url: apiUrl,
		type: "POST",
		async: false,
		data: JSON.stringify(updateObject),
		headers: {
			"accept": "application/json;odata=verbose",
			"X-RequestDigest": $("#__REQUESTDIGEST").val(),
			"Content-Type": "application/json;odata=verbose",
			"X-Http-Method": "MERGE",
			"IF-MATCH": file.ListItemAllFields.__metadata.etag,
		},
		success: function (data) {
			success(data);
		},
		error: function (data) {
			failure(data);
		}
	});
}
3) upload the FileUploadScript.js to one of the Document Library (SharepointMates)
4) Upload the jquery-3.1.1.js(use can you the latest version of Jquery) to one of the Document Library (SharepointMates)
5) copy the below html code to notepad and save the file with a FileUpload.html and upload to one of the Document Library(SharepointMates)
<script type="text/javascript" src="https://tarundev.sharepoint.com/sites/sharepointmates/SharepointMates/Scripts/jquery-3.1.1.js"></script>
<script type="text/javascript" src="https://tarundev.sharepoint.com/sites/sharepointmates/SharepointMates/Scripts/FileUploadScript.js"></script>

<input type="File" id="inputTypeFiles" />

<br>
<input type="button" id="btnUploadFiles" value="submit" Text="Upload"/>
Note:
a) Please give the correct url of the scripts files(FileUploadScript.js and jquery-3.1.1.js) .
b) Make sure the Publishing feature was enable to the site collection
6) Create a page in the Site pages Library( Fileupload.aspx) and Place the content editor webpart in that page. Give the url of the URL of the FileUpload.html in the content Link Section as show below.
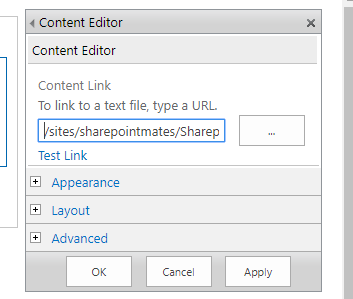
Click on Apply button and Save the Page.
7) Uplod a file and Click on the submit Button.
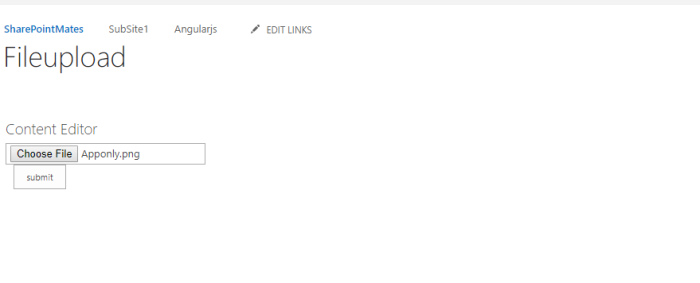
8) The file will be upload to the specific Document Library to the specific Folderpath with the metadata.
In the Next article we will how to upload file with different columns like DateTime,Lookup,Person or Group,Managed Metadata etc….

Nice one.. Waiting for the next article.
LikeLike
Thanks Much…. It works !
LikeLike
Happy to hear that. Thanks for the comment.
LikeLike
Article looks good. I am using Rest API and JQuery for uploading file in sharepoint 2013 online. Unfortunately we cannot upload >250MB, could you please help in solving the issue?
LikeLike
I’m trying the same feature from POSTMAN and able to upload successfully in to On Premise – SharePoint Portal with correct image size. However, when opened the image from the site it says “The image can not be displayed because it contains errors” – This is happening for images only – PNG/JPEG/GIF.
Headers:
Accept : application/json;odata=verbose
X-FORMS_BASED_AUTH_ACCEPTED : f
X-RequestDigest: Generated Value
Content-Type: application/json;odata=verbose
LikeLike
how can we used to upload in subfolders ? on sharepointOnline .
i tried :
var targetUrl = _spPageContextInfo.webServerRelativeUrl + “/” + documentLibrary + “/” + folderName;
var url = webUrl + “/_api/Web/GetFolderByServerRelativeUrl(@target)/Files/add(overwrite=true, url='” + fileName + “‘)?$expand=ListItemAllFields&@target='” + targetUrl + “‘”;
but it always says : alert(“File uploading and meta data updating FAILED”);
LikeLiked by 1 person
how o do same for metadata?
LikeLike